Fun with colored lights - 6/18/19

Another inside photography day. This time I was playing around with this cool mirror my significant other brought home, and the lights I had plus some colored gels.

Canon 5D Mark II w/28-135 @33 - 1/13 Sec - F5.6 - ISO 100

Canon 5D Mark II w/28-135 @33 - 1/13 Sec - F5.6 - ISO 100

The first thing I wanted to do was just get a picture of the cool wolf artwork on this mirror. I really liked how it looked, but getting an image required a number of tries to get it right.

Firstly I had to set up the camera on a tripod with a remote trigger. And raise it slightly above the subject looking down at an angle. That way I could hold up some black foam board and make a nice clean reflection.

Once I figured I had gotten a good enough image of this, I moved on to putting colored gel over the lights.

Canon 5D Mark II w/28-135mm @28 - 0.6 Sec - F5.6 - ISO 100

Canon 5D Mark II w/28-135mm @28 - 0.6 Sec - F5.6 - ISO 100

Red on one side and blue on the other. Clashed to make some cool purple in the middle. While I thought this was cool, how would I do it to keep the colors separate I wonder… hmm.

What if I put another piece of foam board right in the middle so it would block out the light coming from the other side?

That sounds easy but it actually turned out to be harder than I thought. First I had to turn the whole mirror upside down I could press the foam board right up against the mirror. But it only touched the frame, letting light bleed through. So I used a piece of black cloth I used for backdrops in other projects to stuff the gap it had made.

It took significantly more tries at this, the trick became how to take a long exposure without moving, but holding 3 different things perfectly still. One of which being the foam board directly in front of the lens so it would appear as small as possible.

Canon 5D Mark II w/28-135mm @28 - 0.6 Sec - F5.6 - ISO 100

Canon 5D Mark II w/28-135mm @28 - 0.6 Sec - F5.6 - ISO 100

In the end it came out looking like that. Not too bad if I do say so myself. A fun little project playing around with light and color.

A trip up the mountain - 6/14/19

I was itching to get back out in nature, and most nights I would come home from my job I didn’t like. Flop onto my bed and pull up google maps or earth and start zooming in on any patch of green near me. This was how I found several places I couldn’t get to, and a few I could. Often during this summer I would get off of work and just start driving. Typically traffic wouldn’t be too bad by the time I got off work. (I worked a later day, on purpose for that reason)

That’s how I came across a mountain about a half hour away. I also had already been up near there at the forest I’ve mentioned before.

Turns out the mountain was a popular spot. It’s got a few miles of walking trails going up and around the mountain.

I did manage to see a deer while I was out there.

Canon 5D Mark II w/Tamron 150-600mm @600 - 1/20 Sec - F6.3 - ISO 400

Canon 5D Mark II w/Tamron 150-600mm @600 - 1/20 Sec - F6.3 - ISO 400

Canon 5D Mark II w/Tamron 150-600mm @600 - 1/25 Sec - F6.3 - ISO 3200

Canon 5D Mark II w/Tamron 150-600mm @600 - 1/25 Sec - F6.3 - ISO 3200

Now in this deep of forest cover the light wasn’t great, hence why it auto suggested such a low shutter speed. Considering I was handholding and not on the tripod I’m lucky any of these came out. I took about 10 in all and those two aren’t too bad.

Also fuzzy antlers are cute.

That was the only wildlife I saw on this trip at all. Like I said, it was pretty busy human wise unfortunately.

Eventually I made my way to the top of the mountain and there was a very pretty view up there. And even more people holy cow. But I did some landscape shots.

Overlook 1.jpg
Overlook 2.jpg

I can’t exactly give the metadata for the above shots because they aren’t single shots. If you were to go to a gorgeous sunset like this, take out your camera and take a single picture with one exposure you would only get what you exposed for. Be it the sky, or ground. Etc.

This whole thing is explained by better much better than I can do, I would look for bracketing and HDR. Those search terms should get you going.

Briefly, your camera has focus points. And I highly suggest turning on the ability to select which focus point you want to be active at one time. Instead of letting the camera choose for you. The more control you have over something the more you will learn and it gives you more options for creativity. So for the above shots I would have set up the camera on the tripod. And put the focus point in the sky, adjusted my exposure for that. Then without moving the actual camera body, moved my focus point down and exposed for there as well.

Then using the software of your choice, as I mentioned before I had now made the switch to Lightroom. (it has this feature built in) You’ll merge the photos together to create an HDR, High Dynamic Range, photo. Even the best camera in the world can’t match what your eye can do. Which is be able to look at a sunset like this and see clouds in the sky, and details on the ground at the same time. So we do the best we can with the multiple shots and bracketing of exposure to try and match that.

Now the first image is far more like reality with the blue sky. I overdid it a bit on the touching up process but this was my first attempt.

The second image is just to see if I could merge the photos and make the sunset yellow. With the mountains it made it look very Lion King to me.

Overlook bracketed.jpg

And this last one another bracketed shot, with a bit of sun flare. I think the last one is the most realistic to what my eye saw that day.

However, you’ll also notice some objects in the sky. The dark spots. This and a few more shoots like it with the wide angle lens and I would discover that it was dirt on the inside of my lens. I had tried cleaning the outside, and soon I would look up videos on how to clean my DSLR sensor. Eventually I would actually take apart the wide angle lens and clean it completely. I can’t say I recommend this as I screwed mine up the first time putting it back together. But I got it in the end and it works better than ever. If you’re going to do it, follow instructions exactly.

So, to sum up. Pretty walk, pretty overlook on the mountain. Fun but not enjoyable with how crowded it was. I guess Friday night during the summer the mountain top is the place to be.

Calligraphy Photoshoot do-over - 6/1/19

If you read the post from a few months back, you would know about the friend who does Calligraphy for a side business and how I attempted to take some high quality photos of their stuff for them.

And more or less failed. It was a lot of lessons learned that day, and I planned to not make them again for the second attempt.

So things I did differently. First was approaching the situation with a completely different mindset. Instead of relying on my previous experience. I had lots of experience assisting shooting acrylic, but that was for a very different situation. More of archiving and record keeping. A bit of product for an e-commerce approach but we barely did anything like that at my job. This was very different, these pictures needed to show how useful they were. How colorful and cute it would make your wedding. So obviously instead of just shooting them in a lightbox, we went to a local park.

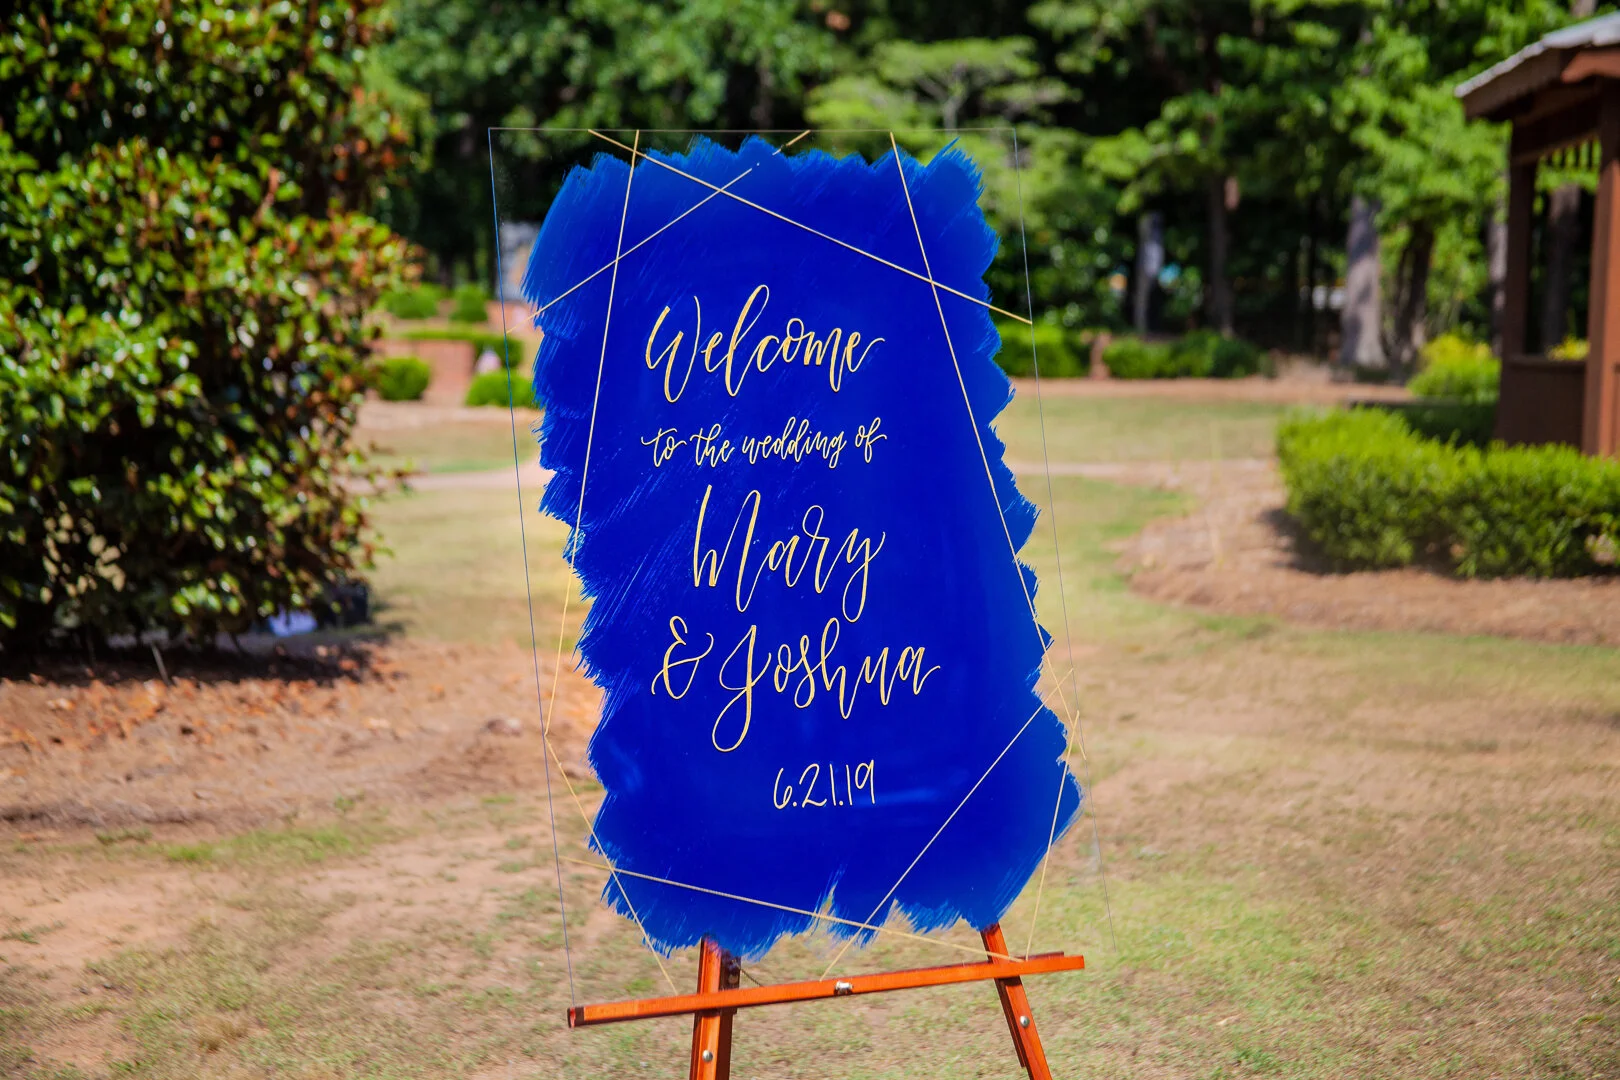
There were a few different things we were shooting that day. A big acrylic welcome sign was going to be the hardest. I had gone out the day before and picked up a few things to help with the shoot, and one that I’m very thankful to have found cheap was a large wooden easel.

We started with that in a few different spots for nice green backgrounds. As well as the last thing we shot was again the acrylic sign in front of a gazebo. Those didn’t come out because the sun was setting behind the gazebo by the end of the day.

Canon 5D Mark II w/28-135mm @ 80 - 1/1250 Sec - F5 - ISO 400

Canon 5D Mark II w/28-135mm @ 80 - 1/1250 Sec - F5 - ISO 400

I’ll go ahead and mention I’m just hand picking my favorites from this shoot. I delivered 25 edited and finished photos to the client, so she had plenty to pick and choose from or provide feedback. Here I’m just going over the ones I thought came out well and what I did differently.

I think the sign came out looking the best in this one. Unfortunately that was the spot with the least green grass to complement. But all the others it looked very unnatural in the edit. Shooting a big sheet of acrylic in the sunlight without getting reflections. I knew it would be the hardest one and that’s why we started with it. We tried our best, I knew to bring some microfiber towels to try and get the fingerprints off as we moved it from place to place. It was still better than we had done with acrylic before with the lightbox. But it was a challenge, that’s for sure.

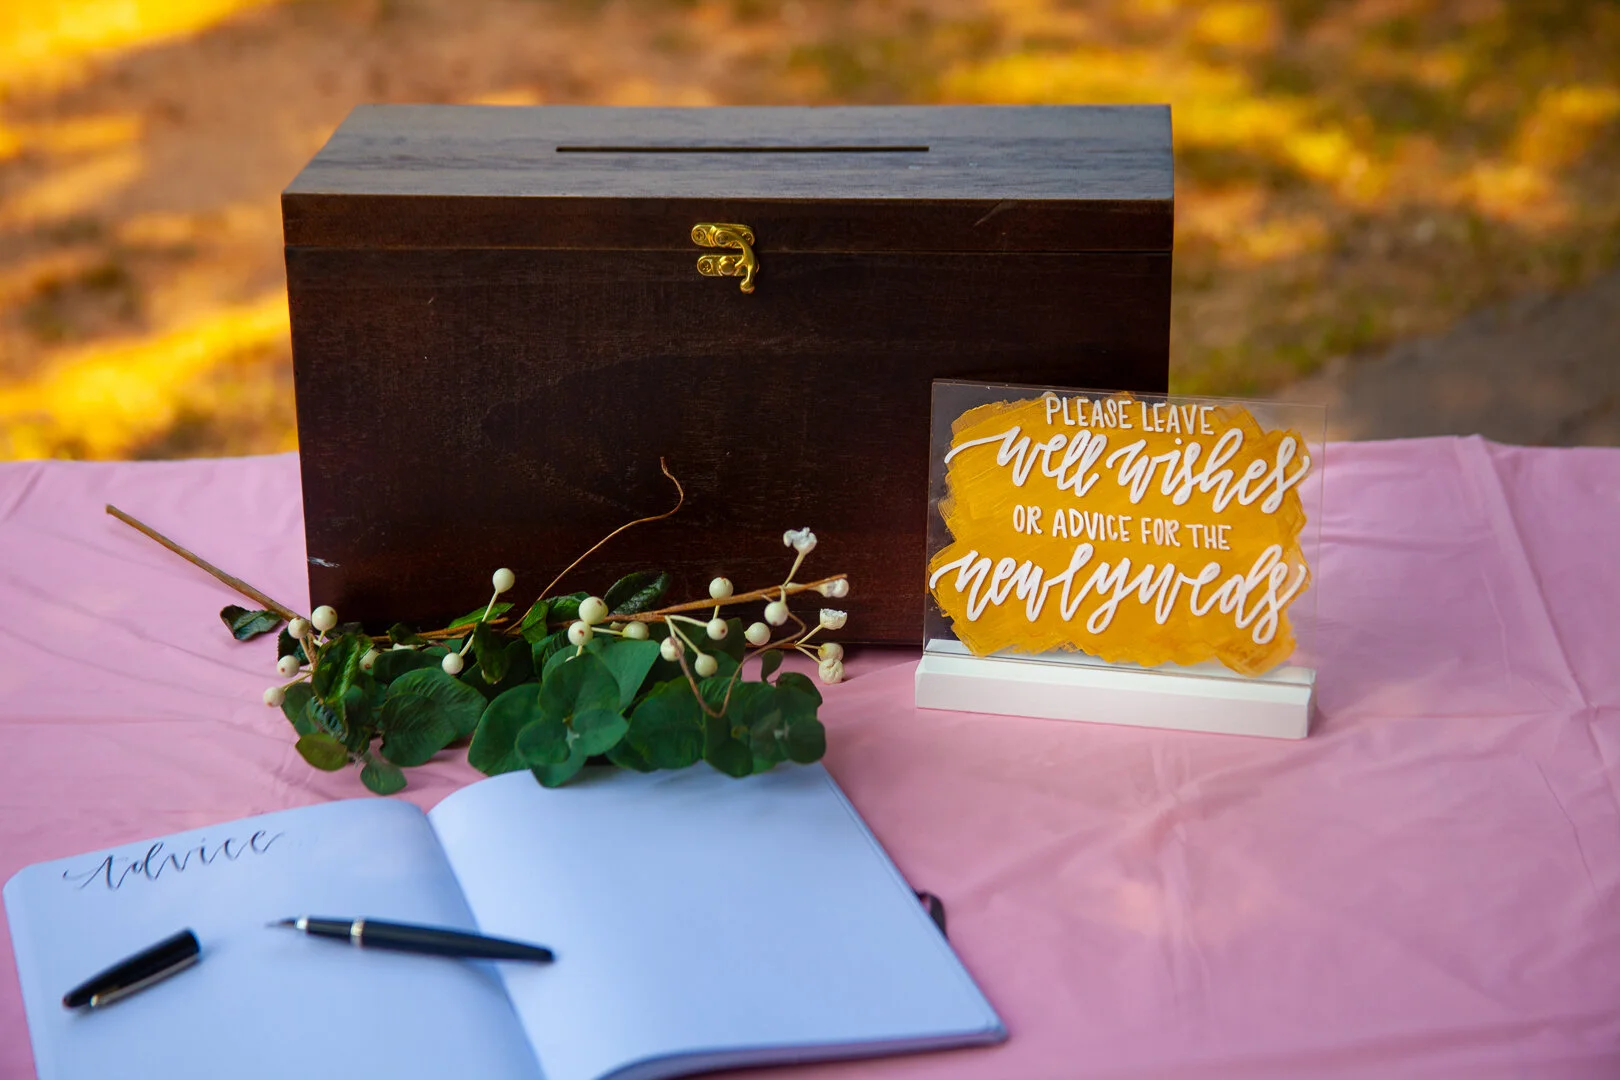
The next thing to tackle was a sign for an advice book for the married couple.

Canon 5D Mark II w/28-135mm @90 - 1/400 Sec - F5.6 - ISO 400

Canon 5D Mark II w/28-135mm @90 - 1/400 Sec - F5.6 - ISO 400

I think this one came out pretty damn nice. The cute box and the sprig of branch were the clients, and I picked up a notebook and brought a fountain pen. Again I put thought into it before hand and thought if the sign is meant to accompany the book for people to write their advice in… Just makes sense.

I think by accident the more yellow and dead grass behind it pairs well with the gold on the sign.

And just for fun, I did one in almost all greyscale. Because I thought it looked cool.

Canon 5D Mark II w/28-135mm @105 - 1/50 Sec - F14 - ISO 400

Canon 5D Mark II w/28-135mm @105 - 1/50 Sec - F14 - ISO 400

Next up we did a table setting for two purposes. First was a table number sign. Which we also did with a tile, as people have different choices for those.

Canon 5D Mark II w/28-135mm @75 - 1/160 Sec - F5.6 - ISO 400

Canon 5D Mark II w/28-135mm @75 - 1/160 Sec - F5.6 - ISO 400

Canon 5D Mark II w/28-135mm @70 - 1/125 Sec - F9 - ISO 400

Canon 5D Mark II w/28-135mm @70 - 1/125 Sec - F9 - ISO 400

And last, but not really last because we did the sign again in front of the gazebo we were now shooting on the table, we had little tiles with people’s names on them. Coasters I believe they were used as. Very cool little ceramic tile with rubber stoppers on the bottom so it wouldn’t slide.

Canon 5D Mark II w/28-135mm @38 - 1/160 Sec - F5.6 - ISO 400 (this was one shot much wider to fit everything and then cropped to take out the lights I had set up)

Canon 5D Mark II w/28-135mm @38 - 1/160 Sec - F5.6 - ISO 400 (this was one shot much wider to fit everything and then cropped to take out the lights I had set up)

Canon 5D Mark II w/28-135mm @56 - 1/1600 Sec - F5.6 - ISO 400

Canon 5D Mark II w/28-135mm @56 - 1/1600 Sec - F5.6 - ISO 400

And that’s enough to get the idea. Overall it was a lot of fun, gave me an opportunity to stretch out creatively. And for thinking in a different mindset from the photography I usually do. All for that and hopefully a few good pictures for the client. I think a few of the ones above came out really well. I’m happy with them.

The last thing I’ll mention is because it was a fairly major change I made that has SERIOUSLY helped my editing. I made the move to Lightroom with this photo shoot. Now I still use Photoshop for a lot, especially when anything needs major tweaking or heavy edits. But for the majority of what I shoot, Lightroom was a much better solution. I never tried it before, as the program I learned on was Photoshop. My professional photographer brother always preferred it. Although he did say he used Lightroom a few times when it came to shooting weddings, the idea of batch editing (making changes to all the photos in a collection at once) was very appealing. Especially when it came to a large shoot like the one I did that day. When we wrapped up and I came home to edit I had over 200 photos to sort through. Lightroom made that a lot easier to sort, rate and then edit.

Very happy I switched over and I would highly recommend it to anyone else.